There are many ways to grab attention, but the Albanian TV station Zjarr takes it to a whole new level.
Back in 2016, TV channel ZJARR garnered headlines by using a provocative format — featuring scantily clad anchors — to attract viewers and boost ratings.
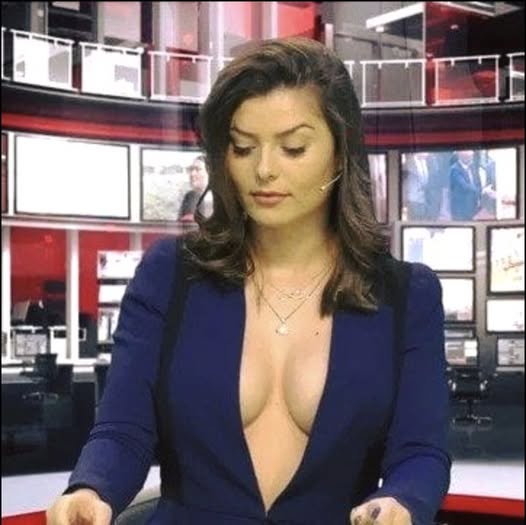
The TV presenters wore open jackets with nothing underneath while delivering the latest news. It sparked a significant buzz in Albania, a small and conservative country in the Balkans, Europe.
According to the TV station’s owner, the approach was a success — and perhaps even a necessity, considering Albania’s history.
For 40 years, the country was held hostage by Enver Hoxha, a notorious communist dictator who ruled from 1944 until his death in 1985. His regime was defined by strict censorship, civil oppression, and an atmosphere of social mistrust.
”In Albania, where the news is manipulated by political powers, the audience needed a medium that would present the information like it is – naked,” Zjarr TV owner Ismet Drishti told AFP in 2016.
”A bit unconventional”
Drishti assured that their hosts’ nudity was a way to demonstrate transparency and impartiality on television.
”We don’t sell sex, we reproduce the news as it is. It’s both symbolic and good publicity,” said Drishti.
Since it was so successful, the owners wanted to expand the concept. For a while, Zjarr TV considered also broadcasting news bulletins in French and English with ”bare information,” following the same model.
The concept also turned the channel’s presenters into major stars. One was Enki Bracaj, 21, who hosted an international news program. Her eye-catching outfits, which often revealed her cleavage, apparently resonated with many viewers, leading to soaring ratings.
”Most agree that her presentation style is a bit unconventional, but we are actively working on that. Honestly, it doesn’t seem to be hurting her viewer ratings at all,” a spokesperson for the channel commented.
Consulted with her parents
Enki Bracaj landed her high-profile job after auditioning with her blouse open, proving she was far from a traditional journalist.
At the time, the young woman studied public relations at her local university. In 2016, she reflected on her decision to go braless during the on-screen testing, saying: ”I simply found a way to put myself ahead in this competitive industry.”
Enki shared her thoughts on standing out: ”It was clear that if I wanted to succeed, I needed to be brave and offer something different.” Enki also mentioned that she consulted with her parents before making her decision, and their support made everything easier.
Fired after Playboy offer
However, there were clear boundaries for what Zjarr TV would tolerate from its news anchors. Officially, Enki left the channel citing dissatisfaction with her salary, but her colleagues hinted at a different story.
The real reason was that when Enki Bracaj accepted a modeling job with Playboy, her employers at the TV station felt she had crossed the line. Nudity and even topless bathing remain taboo in conservative Albania, where about 60 percent of the population is Muslim, according to Daily Mail.
Finding a new star
When the popular Bracaj was fired, the channel needed to find a replacement. They chose the somewhat more experienced 24-year-old presenter, Greta Hoxhaj. Like Enki, she also began working in a state of near undress.
”I worked hard for five years in local television, where I remained unnoticed,” a cheerful and relaxed Hoxhaj told AFP. ”I regret nothing — within three months, I became a star.”
In her everyday life, she typically dressed like other women her age, but every morning at the channel, she transformed into a different persona, donning a revealing, preferably pink jacket to read the news. Her stripped-down look ”is only for television, for information,” she said.
Criticism
Zjarr TV isn’t the only place where female anchors have bared it all. In Venezuela, for instance, a presenter on a news website stripped naked to celebrate the success in the Copa America football championships.
Images from the Albanian channel spread like wildfire, and videos featuring the attractive news anchors went viral on social media. One clip of the unclothed presenters garnered nearly 700,000 views on YouTube and continues to attract attention.
While many internet users were eager to find out where they can watch the controversial program, others are raising their voices to demand greater accountability from the media in the fight for respect and equality.
”It’s pathetic to have accepted such a thing just to be on screen,” commented one online critic, while another called the move ”outrageous” and ”disgustingly sexist.”
Images of Greta Hoxhaj frequently pop up on Facebook, sparking ongoing debates. Sometimes, these discussions expand into a broader conversation about how television presenters dress in general.
”There are too many women on TV whose necklines are way too low on various shows. In the last episode of AGT, the two women wore dresses that were VERY questionable. Now, I don’t care what women wear in their everyday lives, but TV should have better standards,” commented one individual.
However, opinions remain divided.
”I see nothing wrong with this picture. It will make particularly men more attentive to the news,” wrote another person.
”Everyone is free to change the channel”
Interestingly, the response from feminist groups and journalist associations in Albania has been rather muted. Zjarr TV has incited little reaction from these organizations.
“There is a diversity of choice, and everyone is free to change the channel,” said Leonard Olli, a journalist and PR specialist in the capital, Tirana.
However, Aleksander Cipa, President of the Union of Albanian Journalists, took a more critical stance on the station’s tactic of using half-naked news anchors. “Nudity cannot resolve the crisis in the media, which will do anything to survive,” he stated.
Never short on bouquets
And in this case, the star of the show, Hoxhaj herself, appeared only mildly fazed by the criticism. In an interview, Hoxhaj states that she hardly pays attention to the endless comments and compliments directed her way.
“What matters to me is that I’m doing well, both in my work and in my newfound fame. I live a beautiful life filled with love,” she shared.
In her neighborhood, everyone adores her, showering her with compliments and closely following her career. Many even offer advice for each episode of her TV show. “I receive countless messages in my inbox, and many viewers call in during the ‘Zbardhi’ show to compliment me. There’s nothing more wonderful than that! Plus, I’m never short on bouquets of flowers — not even twice a week!”
Are you a fan of Greta’s unique style, or do you think there should be more boundaries in how anchors present the news?
We want to hear from you! Share your thoughts in the comments on Facebook!


